

はじめに
「Helmのバージョン3.0が出たらしい。」
Helmと言えば、前もってRBACの設定をしておいて、その後helm initをやってTillerをKubernetesクラスタに配置するという点が特徴でした。しかし、先日Helm3.0がリリースされて、このTillerちゃんがレガシーとなったらしいです。これを追悼しつつ、新しくなったHelmを使ってみます。
Helmとは
ちょっとググると「Kubernetesのパッケージ管理ツール」という説明が書いてあります。Kubernetes上で動く動くアプリケーション、パッケージの管理を行うツールであり、pipとかHomebrewとかyumのようなイメージです。Helmというのは、もともと英語で舵という意味らしい。Kubernetes周辺のものはだいたい海とか船に関連しますね。こういうノリ好き。
Helmプロジェクトは現在、CNCFがメンテナンスしており、Google,Microsoft,Bitnamiなどがコントリビュートしているらしい。(Bitnamiって、VMwareが買収して話題になっていたけど、名前しか知らない…)

Helm用語
少し復習します。
Helm Chart
英語で海図という意味。Helmにおける「パッケージ」の雛形であり、Kubernetesにデプロイするアプリケーションを.tgzで固めたもの。
よく使われるChartは、Helm Hubに公開されており、簡単に利用できる。
Helm Release
Helm Chartを、Kubernetesクラスタ上にデプロイしたもの。
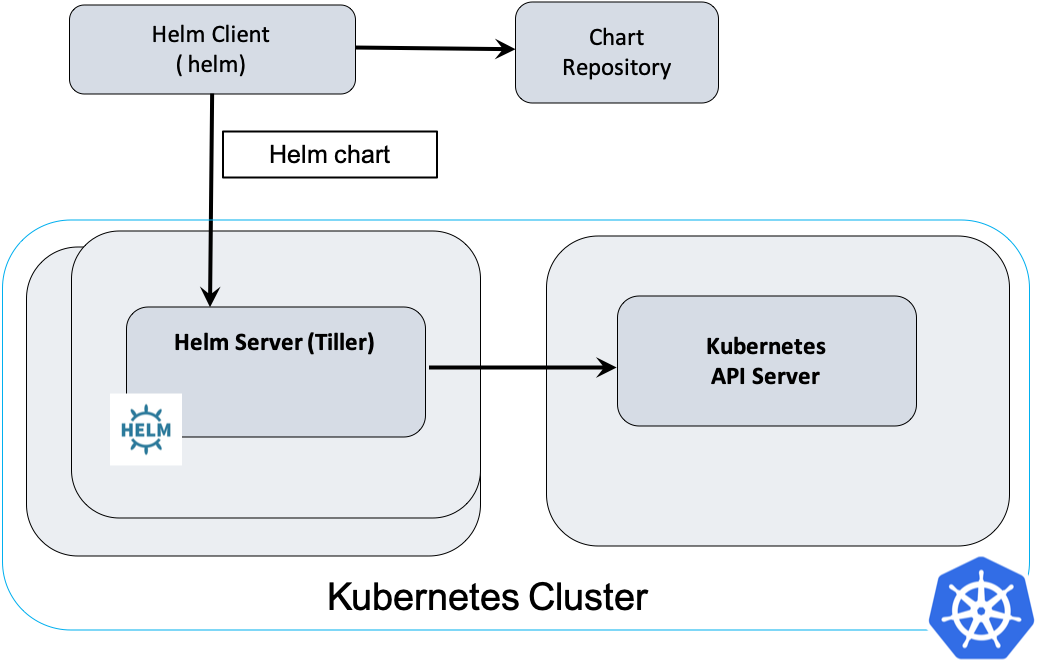
Helm Client と Tiller(〜Helm 2系)
Helm Client(Golang製CLIツール)から、Kubernetesクラスタ上でPodとして動作するTillerに指示を出し、Tillerがそれを受けてKubernetes API Serverを叩くことで、アプリケーションをデプロイする。
Helm 2 is a client-server architecture with the client called helm and the server called Tiller. The client is a CLI that users interact with to perform different operations like install, upgrade, and delete. As seen in the following diagram, the client interacts with Tiller and the chart repository. Tiller interacts with the Kubernetes API server. It renders Helm template files into Kubernetes manifest files, which it uses for operations on the Kubernetes cluster through the Kubernetes API.
(引用元: https://developer.ibm.com/blogs/kubernetes-helm-3/)
Tillerなき今。Helm 3.0
先に書いたように、最新のHelm3.0では、このTillerがクビになりました。理由は、この辺りに書いています。
With role-based access controls (RBAC) enabled by default in Kubernetes 1.6, locking down Tiller for use in a production scenario became more difficult to manage. Due to the vast number of possible security policies, our stance was to provide a permissive default configuration. This allowed first-time users to start experimenting with Helm and Kubernetes without having to dive headfirst into the security controls. Unfortunately, this permissive configuration could grant a user a broad range of permissions they weren’t intended to have. DevOps and SREs had to learn additional operational steps when installing Tiller into a multi-tenant cluster.
https://helm.sh/docs/faq/#changes-since-helm-2
RBACがデフォルトとなったKubernetesにおいて、Tillerに与える権限管理の煩雑さ(Tiller用に名前空間を作って、Roleを作って、ServiceAccount、RoleBinding、、、)や、マルチテナントのクラスターにTillerをインストールする際の運用負荷などを考慮して、Tillerはお役御免となったようです。
クラスタの中のTillerに指示をだすわけだから、セキュリティ面で大変なのは想像つきます。以下の記事が参考もなるかもしれません。
Configuring minimal RBAC permissions for Helm and Tiller
Helm’s tiller in a multi-tenant kubernetes cluster
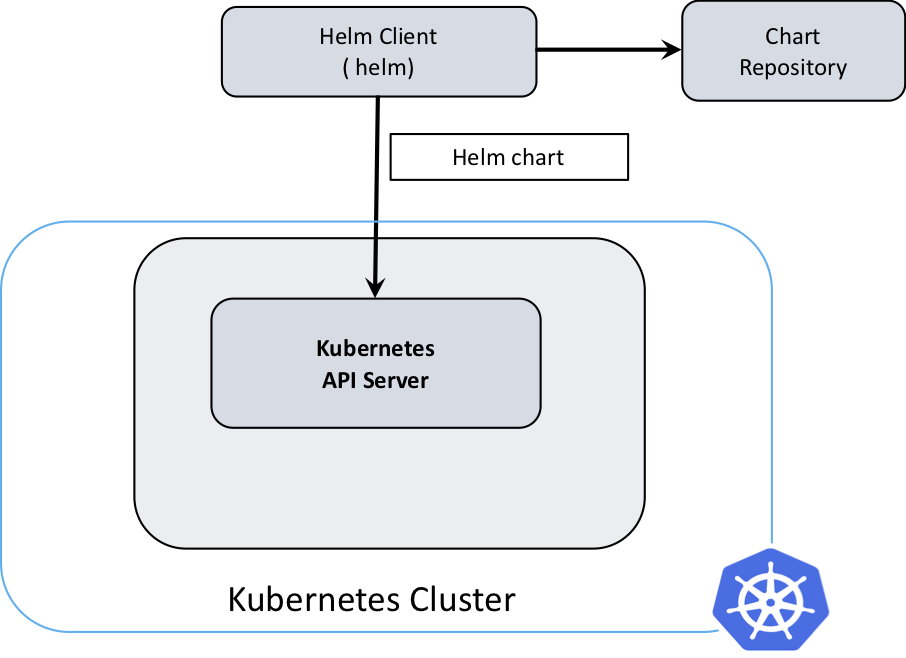
TillerちゃんがいないHelm3.0。Helmの権限管理はkubeconfigを用いて行われ、Helm clientから直接Kubernetes API Severに指示を出すようなアーキテクチャになったようです。まるでkubectl!
Helm 3 has a client-only architecture with the client still called helm. As seen in the following diagram, it operates similar to the Helm 2 client, but the client interacts directly with the Kubernetes API server. The in-cluster server Tiller is now removed.
(引用元: https://developer.ibm.com/blogs/kubernetes-helm-3/)
やってみる
Docker DesktopでKubernetesを有効化
Docker Desktopの機能により、ローカルマシン上でKubernetesクラスタを小さく構築し、すぐに試すことができます。minikubeでもいいけど。
- Enable Kubernetesにチェックを入れ、Applyします

- リソースの割り当ては、お好みで

- Contextは、
docker-desktopを指定します

Kubernetes is Runningとなれば、完了です

kube-systemのPodたちも動きだしました
|
1 2 3 4 5 6 7 8 9 10 11 12 |
$ kubectl get pods -n kube-system NAME READY STATUS RESTARTS AGE coredns-6dcc67dcbc-qhqnf 1/1 Running 0 2m56s coredns-6dcc67dcbc-w4v5k 1/1 Running 0 2m56s etcd-docker-desktop 1/1 Running 0 2m5s kube-apiserver-docker-desktop 1/1 Running 0 2m5s kube-controller-manager-docker-desktop 1/1 Running 0 100s kube-proxy-qvhkd 1/1 Running 0 2m55s kube-scheduler-docker-desktop 1/1 Running 0 100s $ kubectl version Client Version: version.Info{Major:"1", Minor:"16", GitVersion:"v1.16.2", GitCommit:"c97fe5036ef3df2967d086711e6c0c405941e14b", GitTreeState:"clean", BuildDate:"2019-10-15T23:42:50Z", GoVersion:"go1.12.10", Compiler:"gc", Platform:"darwin/amd64"} Server Version: version.Info{Major:"1", Minor:"14", GitVersion:"v1.14.8", GitCommit:"211047e9a1922595eaa3a1127ed365e9299a6c23", GitTreeState:"clean", BuildDate:"2019-10-15T12:02:12Z", GoVersion:"go1.12.10", Compiler:"gc", Platform:"linux/amd64"} |
Helmのセットアップ
公式チュートリアルを参考にやっていきます。
インストール
Homebrewなら、コマンド一発。
|
1 2 |
brew install helm |
ちゃんとバージョン3.0がインストールできました。
|
1 2 3 |
$ helm version version.BuildInfo{Version:"v3.0.0", GitCommit:"e29ce2a54e96cd02ccfce88bee4f58bb6e2a28b6", GitTreeState:"clean", GoVersion:"go1.13.4"} |
Chartリポジトリの追加
リポジトリを指定すれば、利用可能なHelm Chartが見られるようになります。
|
1 2 3 4 5 6 7 8 9 10 11 12 13 |
$ helm repo add stable https://kubernetes-charts.storage.googleapis.com/ "stable" has been added to your repositories $ helm search repo stable NAME CHART VERSION APP VERSION DESCRIPTION stable/acs-engine-autoscaler 2.2.2 2.1.1 DEPRECATED Scales worker nodes within agent pools stable/aerospike 0.3.1 v4.5.0.5 A Helm chart for Aerospike in Kubernetes stable/airflow 5.2.0 1.10.4 Airflow is a platform to programmatically autho... stable/ambassador 5.0.0 0.85.0 A Helm chart for Datawire Ambassador stable/anchore-engine 1.3.7 0.5.2 Anchore container analysis and policy evaluatio... stable/apm-server 2.1.5 7.0.0 The server receives data from the Elastic APM a... stable/ark 4.2.2 0.10.2 DEPRECATED A Helm chart for ark ... |
Tillerの導入
バージョン3.0なので、不要!!!
Helmの利用
インストールして、リポジトリを追加すれば、もうHelmが使えるようになりました!試しにstable/wordpressというChartを用いて、ローカルのKubernetesクラスタにwordpressをデプロイしてみます。GitHubのページがあるので、これを参考にすればいいだけです。
helm install コマンドの変更点
少し悩んだのは、helm installの作りが少し変わっているところ。GitHubの手順は更新されていなかったので、ご注意ください。
以前はこのようにhelm installしていました。--nameをつけるとHelm Releaseの名前を指定でき、つけないと自動で命名されていました。
- Helm 2
$ helm install stable/wordpress

$ helm install --name my-release stable/wordpress
しかし、Helm3.0以降では、以下のようになります。--generate-nameをつけると自動で命名され、つけない場合はhelm installの直後に名前を指定しないといけない。
- Helm 3
$ helm install --generate-name stable/wordpress

$ helm install my-release stable/wordpress
気を取り直して、helm install
それっぽいコマンドを打っておく。一応、Chartの説明に目を通す。
|
1 2 3 4 5 6 7 8 9 10 11 12 13 14 15 16 17 18 19 20 21 22 23 24 25 26 27 28 29 30 31 32 33 |
$ helm repo update Hang tight while we grab the latest from your chart repositories... ...Successfully got an update from the "stable" chart repository Update Complete. ⎈ Happy Helming!⎈ $ helm show chart stable/wordpress apiVersion: v1 appVersion: 5.3.0 dependencies: - condition: mariadb.enabled name: mariadb repository: https://kubernetes-charts.storage.googleapis.com/ tags: - wordpress-database version: 7.x.x description: Web publishing platform for building blogs and websites. home: http://www.wordpress.com/ icon: https://bitnami.com/assets/stacks/wordpress/img/wordpress-stack-220x234.png keywords: - wordpress - cms - blog - http - web - application - php maintainers: - email: containers@bitnami.com name: Bitnami name: wordpress sources: - https://github.com/bitnami/bitnami-docker-wordpress version: 8.0.1 |
そしてインストール。いろいろオプションを指定できるらしいけど、シンプルにhelm installしてみる。
|
1 2 3 4 5 6 7 8 9 10 11 12 13 14 15 16 17 18 19 |
$ helm install my-release stable/wordpress NAME: my-release LAST DEPLOYED: Tue Dec 3 23:15:33 2019 NAMESPACE: default STATUS: deployed REVISION: 1 NOTES: 1. Get the WordPress URL: NOTE: It may take a few minutes for the LoadBalancer IP to be available. Watch the status with: 'kubectl get svc --namespace default -w my-release-wordpress' export SERVICE_IP=$(kubectl get svc --namespace default my-release-wordpress --template "{{ range (index .status.loadBalancer.ingress 0) }}{{.}}{{ end }}") echo "WordPress URL: http://$SERVICE_IP/" echo "WordPress Admin URL: http://$SERVICE_IP/admin" 2. Login with the following credentials to see your blog echo Username: user echo Password: $(kubectl get secret --namespace default my-release-wordpress -o jsonpath="{.data.wordpress-password}" | base64 --decode) |
デプロイできたか確認
my-releaseという名前のHelm Releaseができました。
|
1 2 3 |
$ helm list NAME NAMESPACE REVISION UPDATED STATUS CHART APP VERSION my-release default 1 2019-12-03 23:15:33.327969 +0900 JST deployed wordpress-8.0.1 5.3.0 |
それっぽい名前のKubernetesのリソースもできていますね。
|
1 2 3 4 5 6 7 8 9 10 11 12 13 14 15 16 17 18 19 20 |
$ kubectl get pods NAME READY STATUS RESTARTS AGE my-release-mariadb-0 1/1 Running 0 2m5s my-release-wordpress-fb74d9c86-t4vmh 1/1 Running 0 2m5s $ kubectl get svc NAME TYPE CLUSTER-IP EXTERNAL-IP PORT(S) AGE kubernetes ClusterIP 10.96.0.1 none 443/TCP 63m my-release-mariadb ClusterIP 10.104.31.212 none 3306/TCP 3m50s my-release-wordpress LoadBalancer 10.104.63.71 localhost 80:30702/TCP,443:31299/TCP 3m50s $ kubectl get configmap NAME DATA AGE my-release-mariadb 1 3m58s my-release-mariadb-tests 1 3m58s $ kubectl get secrets NAME TYPE DATA AGE my-release-mariadb Opaque 2 4m11s my-release-wordpress Opaque 1 4m11s |
少し待つと、ブラウザからhttp://localhostにアクセスできるようになります。
さいごに
新しいHelm3.0を触ってみました。Tillerがいないだけで、チュートリアルもサクサク進めることができます。Helmインストール→リポジトリ追加だけで、すぐにChartが使えるようになり、これならパッケージ管理ツールと呼ぶことにも違和感がなくなりそうです。


コメント