はじめに
kubernetesクラスタの運用をしていく中で、避けて通れないのがetcdのバックアップです。kubectlはいっぱい打つけど、etcdctlは何もわからない人々(自分)向けに、メモを残しておきます。
やってみる
環境
今回は、minikubeを使います。Kubernetesの公式ドキュメントに沿って、簡単にインストールできるので便利ですね。
今回使うバージョンは、以下の通りです。
|
1 2 3 4 5 6 7 8 9 |
$ minikube version minikube version: v1.11.0 $ kubectl config view | grep current-context current-context: minikube $ kubectl version Client Version: version.Info{Major:"1", Minor:"18", GitVersion:"v1.18.3", GitCommit:"2e7996e3e2712684bc73f0dec0200d64eec7fe40", GitTreeState:"clean", BuildDate:"2020-05-21T14:51:23Z", GoVersion:"go1.14.3", Compiler:"gc", Platform:"darwin/amd64"} Server Version: version.Info{Major:"1", Minor:"18", GitVersion:"v1.18.3", GitCommit:"2e7996e3e2712684bc73f0dec0200d64eec7fe40", GitTreeState:"clean", BuildDate:"2020-05-20T12:43:34Z", GoVersion:"go1.13.9", Compiler:"gc", Platform:"linux/amd64"} |
etcd Podの確認
Minikubeでは、コントロールプレーンのコンポーネントはPodとして動作します。名前空間はkube-systemで、下記のようにPodの一覧を取得できます。etcd-minikubeというのがetcdのPodです。
|
1 2 3 4 5 6 7 8 9 10 |
$ kubectl get pods -n kube-system NAME READY STATUS RESTARTS AGE coredns-66bff467f8-jrswm 1/1 Running 0 2m15s coredns-66bff467f8-lwq8t 1/1 Running 0 2m15s etcd-minikube 1/1 Running 0 2m22s kube-apiserver-minikube 1/1 Running 0 2m22s kube-controller-manager-minikube 1/1 Running 0 2m22s kube-proxy-h9tvr 1/1 Running 0 2m15s kube-scheduler-minikube 1/1 Running 0 2m22s storage-provisioner 1/1 Running 0 2m21s |
etcd-minikubePodでは、以下のようにetcdコマンドが実行されています。
|
1 2 3 4 5 6 7 8 9 10 11 12 13 14 15 16 17 18 19 20 21 22 23 24 25 26 27 28 |
$ kubectl -n kube-system describe pods etcd-minikube Name: etcd-minikube Namespace: kube-system [...] Containers: etcd: [...] Command: etcd --advertise-client-urls=https://192.168.64.3:2379 --cert-file=/var/lib/minikube/certs/etcd/server.crt --client-cert-auth=true --data-dir=/var/lib/minikube/etcd --initial-advertise-peer-urls=https://192.168.64.3:2380 --initial-cluster=minikube=https://192.168.64.3:2380 --key-file=/var/lib/minikube/certs/etcd/server.key --listen-client-urls=https://127.0.0.1:2379,https://192.168.64.3:2379 --listen-metrics-urls=http://127.0.0.1:2381 --listen-peer-urls=https://192.168.64.3:2380 --name=minikube --peer-cert-file=/var/lib/minikube/certs/etcd/peer.crt --peer-client-cert-auth=true --peer-key-file=/var/lib/minikube/certs/etcd/peer.key --peer-trusted-ca-file=/var/lib/minikube/certs/etcd/ca.crt --snapshot-count=10000 --trusted-ca-file=/var/lib/minikube/certs/etcd/ca.crt State: Running [...] |
etcdに対するクライアント証明書と鍵の確認
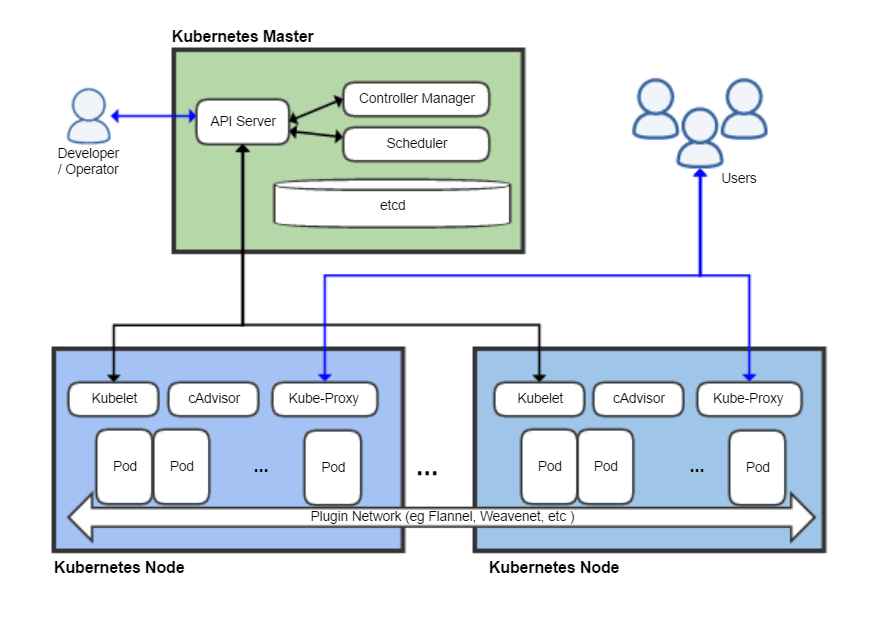
Kubernetesにおいて、etcdにアクセスするのは、Kubernetes API Serverのみです。図はWikipediaからの引用です。

先ほど一覧表示したPodに中で、Kubernetes API Serverにあたるkube-apiserver-minikubeについて、詳しく見てみます。kube-apiserverコンテナで、kube-apiserverコマンドが実行されていることがわかります。
|
1 2 3 4 5 6 7 8 9 10 11 12 13 14 15 16 17 18 19 20 21 22 23 24 25 26 27 28 29 30 31 32 33 34 35 36 37 38 39 |
$ kubectl -n kube-system describe pods kube-apiserver-minikube Name: kube-apiserver-minikube Namespace: kube-system [...] Containers: kube-apiserver: [...] Image: k8s.gcr.io/kube-apiserver:v1.18.3 [...] Command: kube-apiserver --advertise-address=192.168.64.3 --allow-privileged=true --authorization-mode=Node,RBAC --client-ca-file=/var/lib/minikube/certs/ca.crt --enable-admission-plugins=NamespaceLifecycle,LimitRanger,ServiceAccount,DefaultStorageClass,DefaultTolerationSeconds,NodeRestriction,MutatingAdmissionWebhook,ValidatingAdmissionWebhook,ResourceQuota --enable-bootstrap-token-auth=true --etcd-cafile=/var/lib/minikube/certs/etcd/ca.crt --etcd-certfile=/var/lib/minikube/certs/apiserver-etcd-client.crt --etcd-keyfile=/var/lib/minikube/certs/apiserver-etcd-client.key --etcd-servers=https://127.0.0.1:2379 --insecure-port=0 --kubelet-client-certificate=/var/lib/minikube/certs/apiserver-kubelet-client.crt --kubelet-client-key=/var/lib/minikube/certs/apiserver-kubelet-client.key --kubelet-preferred-address-types=InternalIP,ExternalIP,Hostname --proxy-client-cert-file=/var/lib/minikube/certs/front-proxy-client.crt --proxy-client-key-file=/var/lib/minikube/certs/front-proxy-client.key --requestheader-allowed-names=front-proxy-client --requestheader-client-ca-file=/var/lib/minikube/certs/front-proxy-ca.crt --requestheader-extra-headers-prefix=X-Remote-Extra- --requestheader-group-headers=X-Remote-Group --requestheader-username-headers=X-Remote-User --secure-port=8443 --service-account-key-file=/var/lib/minikube/certs/sa.pub --service-cluster-ip-range=10.96.0.0/12 --tls-cert-file=/var/lib/minikube/certs/apiserver.crt --tls-private-key-file=/var/lib/minikube/certs/apiserver.key State: Running [...] |
kube-apiserverコマンドには、たくさんのオプションがついています。多すぎてよくわかりませんが、今回はetcdと付いているものに注目してみます。
|
1 2 3 4 |
--etcd-cafile=/var/lib/minikube/certs/etcd/ca.crt (1) --etcd-certfile=/var/lib/minikube/certs/apiserver-etcd-client.crt (2) --etcd-keyfile=/var/lib/minikube/certs/apiserver-etcd-client.key (3) --etcd-servers=https://127.0.0.1:2379 (4) |
オプション名の通りだと思いますが、公式ドキュメントによれば、以下のような意味があるようです。要するに、etcdと暗号化通信を行うためのCA証明書、クライアント証明書と鍵、接続先のetcdサーバーの情報が記載されています。
| # | option | description |
|---|---|---|
| (1) | --etcd-cafile |
SSL Certificate Authority file used to secure etcd communication. |
| (2) | --etcd-certfile |
SSL certification file used to secure etcd communication. |
| (3) | --etcd-keyfile |
SSL key file used to secure etcd communication. |
| (4) | --etcd-servers |
List of etcd servers to connect with (scheme://ip:port), comma separated. |
どのファイルがどこにあるか調べておくのは重要です。etcdのバックアップをとるときに使うかもしれません。
マスターノードへのログイン
Minikubeは、minikubeというノード1台の構成です。minikube sshコマンドでログインできます。
|
1 2 3 4 5 6 7 8 9 10 11 12 13 14 |
$ kubectl get node NAME STATUS ROLES AGE VERSION minikube Ready master 5m17s v1.18.3 $ minikube ssh _ _ _ _ ( ) ( ) ___ ___ (_) ___ (_)| |/') _ _ | |_ __ /' _ ` _ `\| |/' _ `\| || , < ( ) ( )| '_`\ /'__`\ | ( ) ( ) || || ( ) || || |`\ | (_) || |_) )( ___/ (_) (_) (_)(_)(_) (_)(_)(_) (_)`\___/'(_,__/'`\____) $ |
Masterノードにログインできました。次の作業は、マスターノード上で行います。
etcdctlコマンドの導入
下記の記事を参考にして、etcdctlコマンドを使用します。Docker便利ですね。

|
1 2 |
$ docker run -v /var/lib:/var/lib -v /tmp:/tmp -it --net host -e ETCDCTL_API=3 gcr.io/etcd-development/etcd /bin/sh (container) / # |
次の作業は、etcdctlコマンドが使えるコンテナ上で作業します。
etcdのバックアップ
公式ドキュメントにある通り、etcdctl snapshotコマンドを使います。--endpointsオプションには、kube-apiserverコマンドで--etcd-serversで指定されていた値を指定します。
|
1 2 |
(container) / # ETCDCTL_API=3 etcdctl --endpoints https://127.0.0.1:2379 snapshot save /tmp/snapshot.db Error: context deadline exceeded |
エラーが出てしまいました🤔
etcdのバックアップ テイク2
「context deadline exceeded」と言われたので、次はクライアント証明書などを指定してみます。それっぽいオプションがいくつかあります。
|
1 2 3 4 5 6 7 8 9 10 11 12 13 14 15 16 17 18 19 |
(container) / # ETCDCTL_API=3 etcdctl -h [...] OPTIONS: --cacert="" verify certificates of TLS-enabled secure servers using this CA bundle --cert="" identify secure client using this TLS certificate file --command-timeout=5s timeout for short running command (excluding dial timeout) --debug[=false] enable client-side debug logging --dial-timeout=2s dial timeout for client connections -d, --discovery-srv="" domain name to query for SRV records describing cluster endpoints --endpoints=[127.0.0.1:2379] gRPC endpoints --hex[=false] print byte strings as hex encoded strings --insecure-discovery[=true] accept insecure SRV records describing cluster endpoints --insecure-skip-tls-verify[=false] skip server certificate verification --insecure-transport[=true] disable transport security for client connections --keepalive-time=2s keepalive time for client connections --keepalive-timeout=6s keepalive timeout for client connections --key="" identify secure client using this TLS key file --user="" username[:password] for authentication (prompt if password is not supplied) -w, --write-out="simple" set the output format (fields, json, protobuf, simple, table) |
kube-apiserverコマンドで指定されていたetcdと暗号化通信を行うためのCA証明書、クライアント証明書と鍵を使います。
|
1 2 3 4 5 6 7 8 9 10 11 |
(container) / # ETCDCTL_API=3 etcdctl --endpoints https://127.0.0.1:2379 \ --cacert=/var/lib/minikube/certs/etcd/ca.crt \ --cert=/var/lib/minikube/certs/apiserver-etcd-client.crt \ --key=/var/lib/minikube/certs/apiserver-etcd-client.key \ snapshot save /tmp/snapshot.db Snapshot saved at /tmp/snapshot.db (container) / # exit $ ls /tmp/snapshot.db /tmp/snapshot.db |
ちゃんと取得できています😎
以上.


コメント